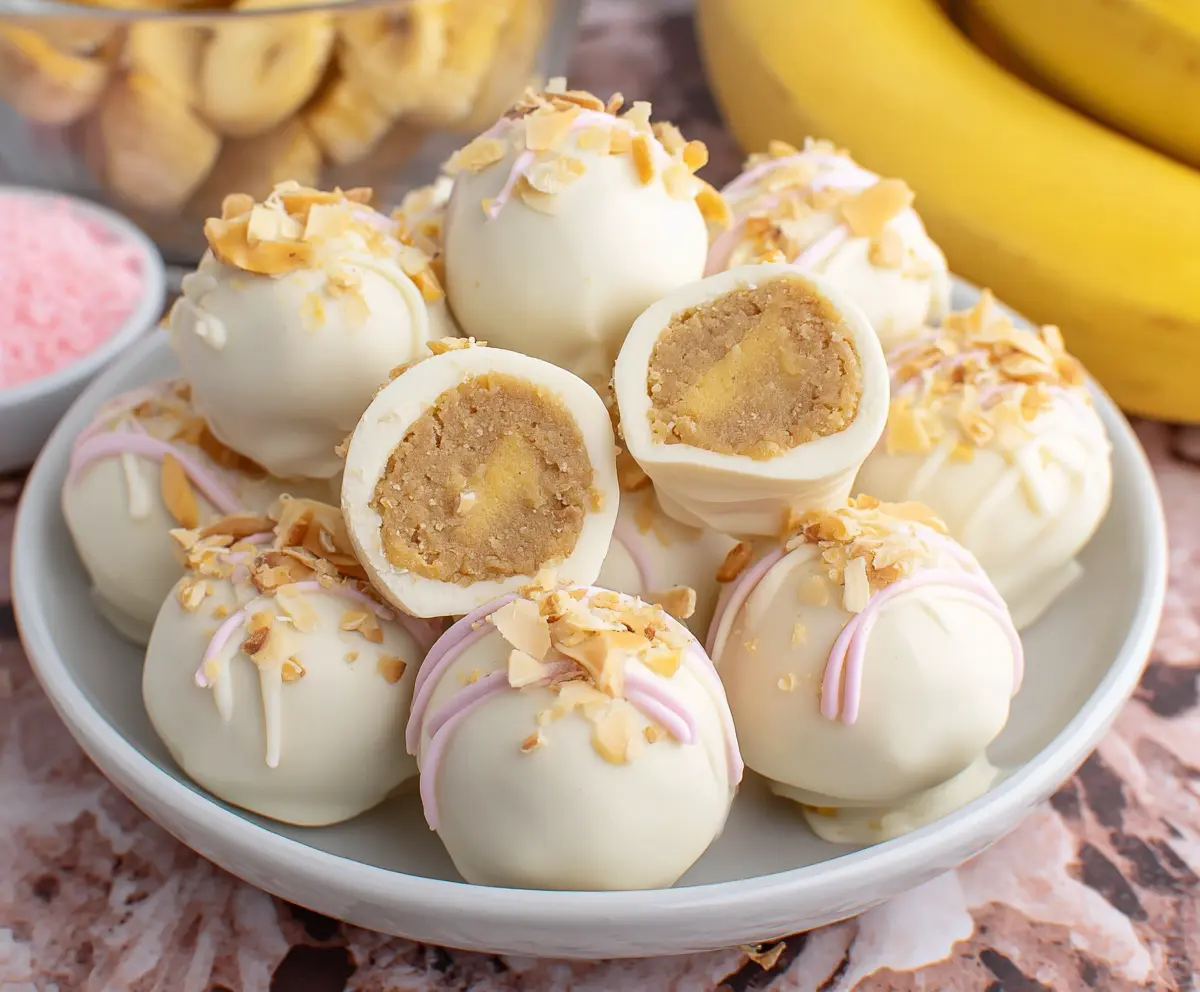
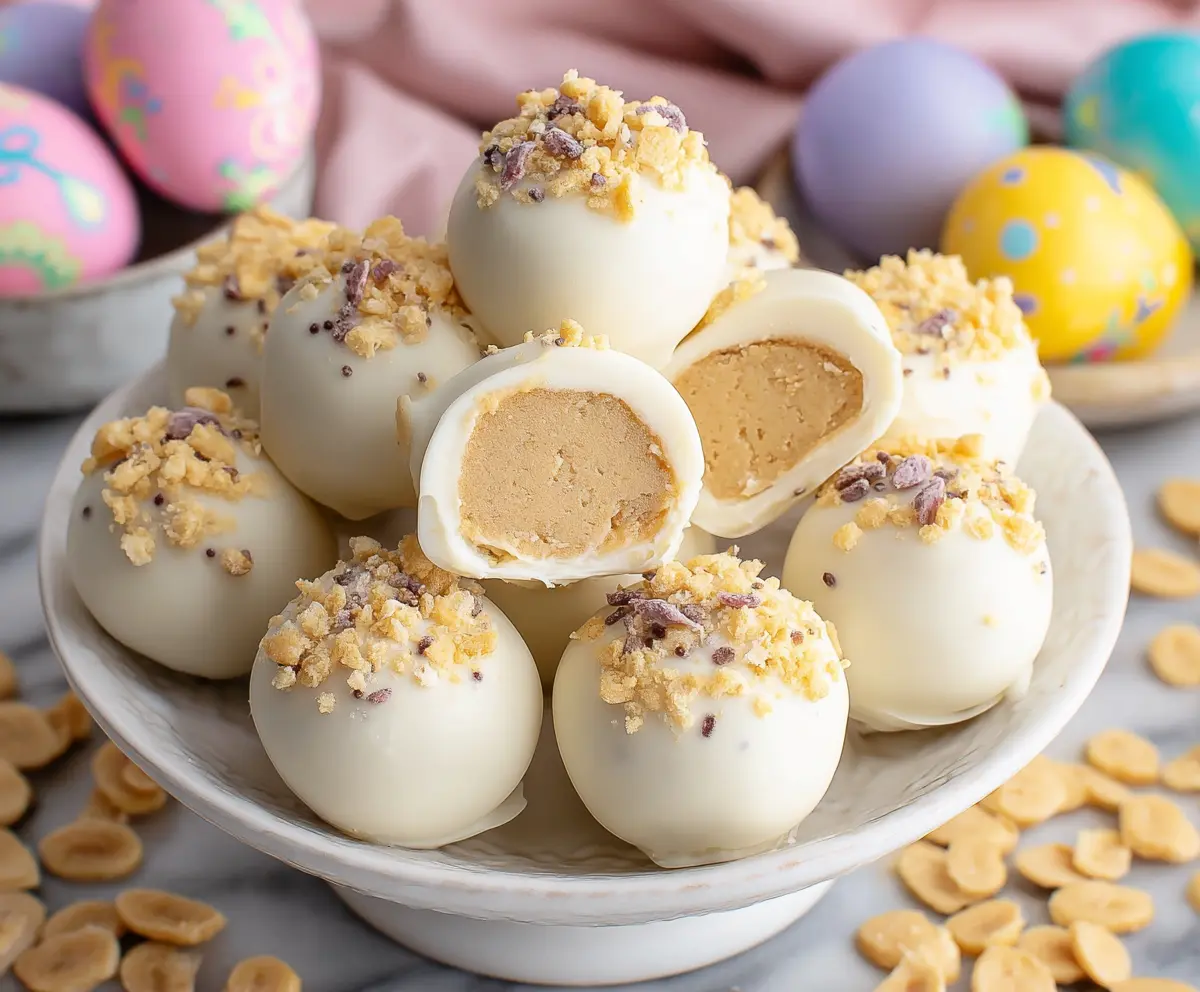
These Banana Pudding Easter Truffles are a tasty treat that blend the flavors of banana, vanilla, and creamy pudding into little bites of joy. They’re perfect for sharing or enjoying on your own!
Rolling them in crushed vanilla wafers makes each truffle extra special. I can’t resist sneaking a few while they set in the fridge—who could say no to that? 😂
With just a few simple steps, I love how easy they are to whip up for Easter gatherings. They always bring smiles and start delicious conversations at the table!
Key Ingredients & Substitutions
Vanilla Wafer Crumbs: These are the base of the truffles and give that classic banana pudding flavor. If you don’t have wafers, you can use graham crackers or shortbread cookies instead for a different twist.
Cream Cheese: This adds creaminess and helps bind the mixture. For a lighter option, you could substitute with Greek yogurt, but the flavor will be slightly different. Upping the sweetness slightly might be necessary since yogurt tends to be tangier.
Banana Pudding: You can use store-bought instant pudding or homemade for a fresher taste. If you’re looking for a different flavor, vanilla pudding works well too. Just keep the banana flavor from the mashed banana!
White Chocolate/Candy Melts: I love using good quality white chocolate; it adds a nice richness. If you’re looking for a lower-calorie option, white candy melts will work just fine. You could use dark chocolate if you prefer a bolder flavor.
How Do I Make Sure My Truffles Hold Their Shape?
Getting your truffles to hold their shape can be a bit tricky at first. Here’s how to do it right:
- Mix all your ingredients until fully blended; it should feel like dough.
- Chill the mixture for about 30 minutes to help firm it up. This step is essential!
- When forming the balls, keep your hands wet to prevent sticking.
- Ensure the chocolate coating is not too hot when dipping, as it can melt the truffles.
Following these steps will help your truffles stay firm and delicious!
How to Make Banana Pudding Easter Truffles
Ingredients You’ll Need:
For the Truffles:
- 1 cup vanilla wafer crumbs (about 30-40 wafers)
- 1/2 cup cream cheese, softened
- 1/4 cup banana pudding (instant mix prepared as per package, or homemade pudding)
- 1 ripe banana, mashed
For the Coating and Toppings:
- 12 oz white chocolate or white candy melts
- 1/4 cup toasted coconut flakes or finely chopped nuts (for topping)
- Pink and white candy melts or icing for drizzle (optional)
How Much Time Will You Need?
This delightful treat will take about 1 hour and 15 minutes to prepare. You’ll spend about 15 minutes mixing and rolling the truffles, followed by 30 minutes chilling them, and then a quick 20 minutes for melting and coating the chocolate. Perfect for a fun Easter dessert!
Step-by-Step Instructions:
1. Mixing the Base:
In a mixing bowl, combine the vanilla wafer crumbs, softened cream cheese, banana pudding, and the mashed banana. Use a spoon or spatula to mix everything until it’s well combined and forms a smooth, moldable dough.
2. Forming the Truffles:
Grab a small portion of the dough and use your hands or a small cookie scoop to shape it into 1-inch balls. Once formed, place each truffle onto a parchment-lined baking sheet.
3. Chilling the Mixture:
Pop the baking sheet with the truffles into the refrigerator for about 30 minutes. This helps them firm up, making them easier to dip in chocolate later.
4. Melting the Chocolate:
While your truffles are chilling, melt the white chocolate or candy melts according to the package instructions. Stir them until the mixture is completely smooth—a microwave or double boiler works great for this!
5. Dipping the Truffles:
Take the chilled banana pudding balls out of the fridge. Using a fork or a dipping tool, dip each ball into the melted white chocolate, ensuring they are fully coated. Gently shake off any excess chocolate before setting them back onto the parchment-lined baking sheet.
6. Adding Toppings:
Before the chocolate coating starts to set, sprinkle the toasted coconut flakes or chopped nuts on top of each truffle. This adds a delicious crunch and makes them look festive!
7. Decorating (Optional):
If you want to get fancy, melt the pink and white candy melts separately. Use a fork to drizzle the melted candy over the coated truffles for that extra eye-catching decoration!
8. Final Chill:
Put the decorated truffles back into the refrigerator for about 15-20 minutes, or until the chocolate coating is completely set.
9. Serve and Enjoy:
Once set, take the truffles out of the fridge, serve them chilled, and enjoy your delicious Banana Pudding Easter Truffles! Perfect for sharing at your Easter celebration or keeping as a sweet treat for yourself!
Can I Use Different Types of Pudding?
Absolutely! While banana pudding gives the best flavor for this recipe, you can substitute with vanilla pudding if you want a more classic taste. Just make sure to keep the mashed banana for that signature banana flavor!
How Should I Store Leftover Truffles?
Store leftover truffles in an airtight container in the refrigerator for up to one week. This will keep them fresh and ready to enjoy whenever you’re craving a sweet treat!
Can I Freeze These Truffles?
Yes, you can freeze the truffles! Just place them in a single layer on a baking sheet until solid, then transfer them to an airtight container or freezer bag. They can last up to 2 months in the freezer. Thaw in the refrigerator before serving!
What’s the Best Way to Melt Chocolate?
The best way to melt chocolate is either in the microwave in short bursts (about 30 seconds at a time, stirring in between) or using a double boiler on the stovetop. This helps prevent overheating and burning, ensuring a smooth, creamy coating.