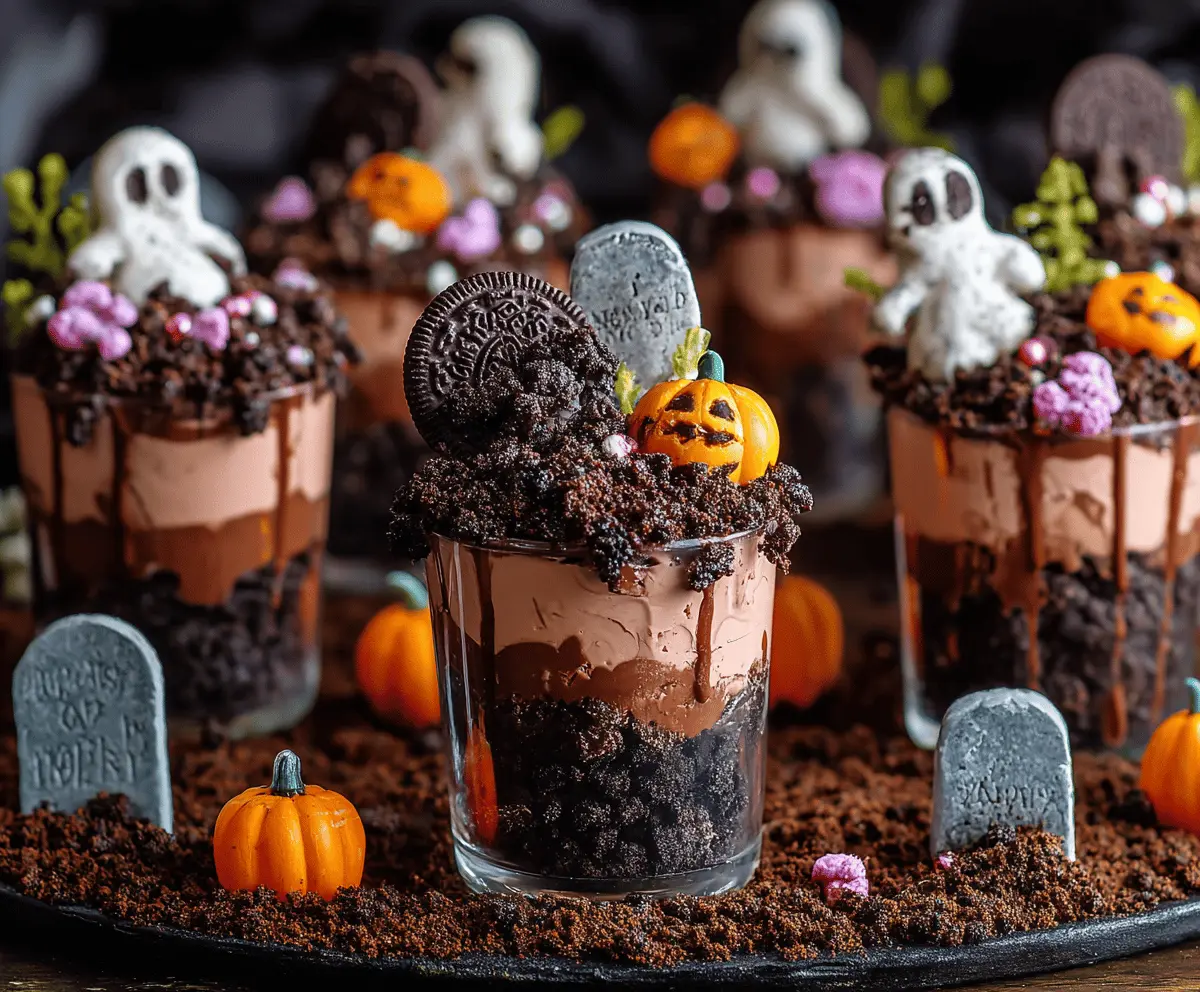
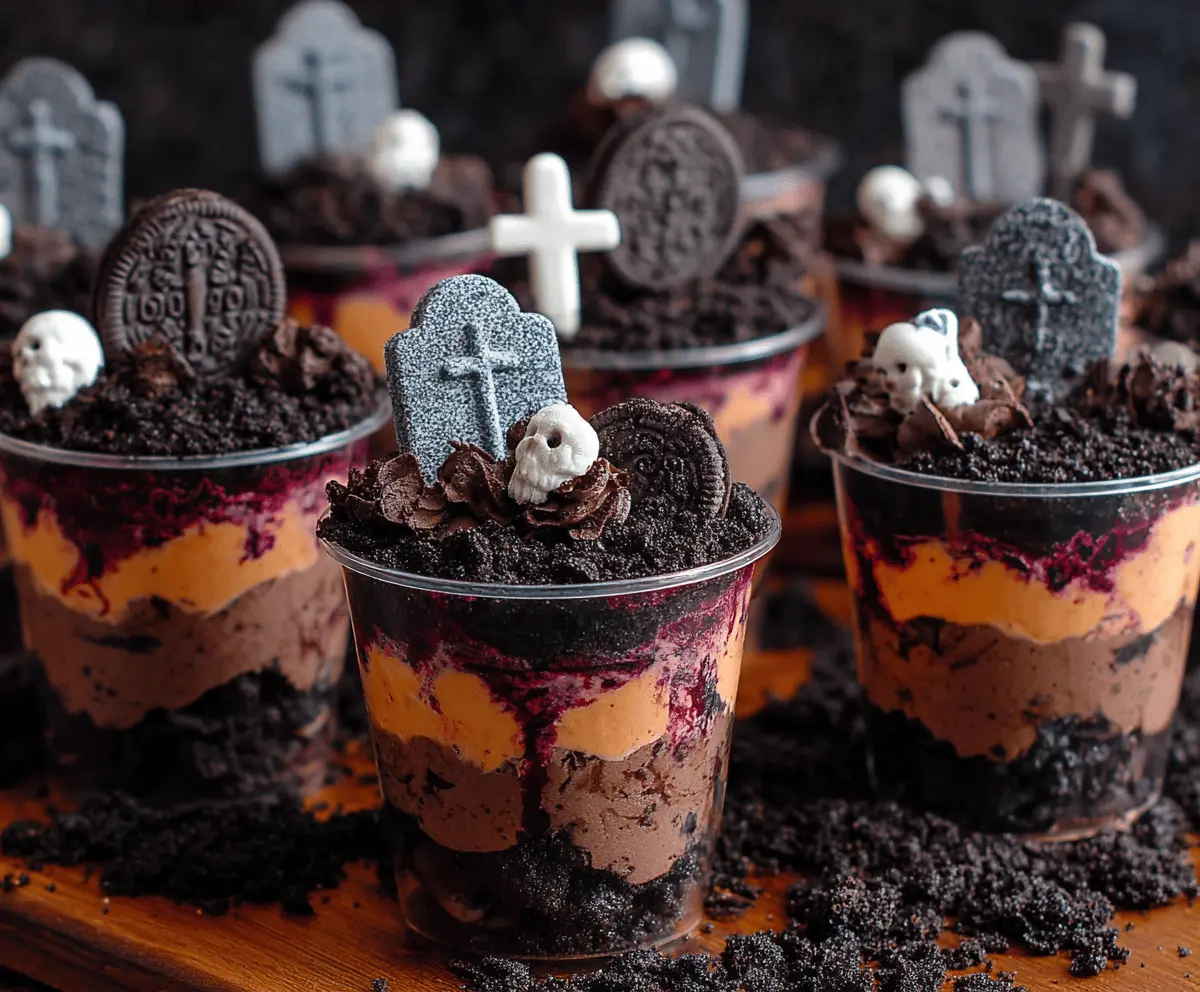
Graveyard Dirt Cups are a fun and spooky treat! Made with chocolate pudding, crumbled cookies, and gummy worms, these cups are sure to delight at any Halloween party.
They look a bit like something from a graveyard, but trust me, they taste way better! I love making these kids’ favorites—it’s a fun and messy way to enjoy dessert together! 🎃
Key Ingredients & Substitutions
Chocolate Sandwich Cookies: Oreos are the classic choice for the “dirt” layer, giving a rich chocolate flavor. If you’re looking for a healthier option, try using chocolate graham crackers or even crushed nuts for a different texture.
Chocolate Pudding: Instant pudding makes this recipe quick and easy. If you’re looking for a homemade version, you can prepare your own pudding using cocoa powder, sugar, milk, and cornstarch.
Cream Cheese: Softened cream cheese adds creaminess to your layers. If you want a lighter option, cream cheese can be replaced with Greek yogurt or a dairy-free cream cheese alternative.
Whipped Topping: This gives a light, fluffy texture to the dessert. Feel free to use homemade whipped cream instead. Just whip heavy cream with a bit of sugar until stiff peaks form for a fresher taste.
Decorations: Besides gummy worms and tombstones, use anything fun that fits the spooky theme! Cookie crumbles, fruit snacks, or even edible glitter can jazz up the cups.
How Do I Build the Layers Without Making a Mess?
Layering can be tricky, but a bit of practice goes a long way! Here are some tips to keep everything neat:
- Use a piping bag or a zip-top bag with the corner cut off to add the cream cheese and pudding layers. It helps you control the amount and keeps it cleaner!
- Fill each layer slowly and gently push it down to minimize air pockets. This will help keep your layers distinct.
- Start and end with the crushed cookies to create a nice “dirt” look. It also helps hide any imperfections!
Chilling the cups before serving allows everything to set nicely, so don’t skip that step! Having fun creating these layers will definitely spark joy during your Halloween gatherings.
How to Make Graveyard Dirt Cups
Ingredients You’ll Need:
For the Base:
- 6 cups crushed chocolate sandwich cookies (e.g., Oreos), divided
- 2 packages (3.9 oz each) instant chocolate pudding mix
- 3 1/2 cups cold milk
For the Cream Cheese Layer:
- 1 package (8 oz) cream cheese, softened
- 1/2 cup powdered sugar
- 1 container (8 oz) whipped topping, thawed
- Orange gel food coloring or orange-colored frosting
For Decoration:
- Black food coloring or black gel coloring (optional, for effect)
- Halloween edible decorations: gummy skulls, chocolate tombstone cookies, candy crosses, mini marshmallow skulls, etc.
How Much Time Will You Need?
This delightful recipe will take about 20 minutes to prepare, plus at least 1 hour for chilling. That means you can mix, layer, and decorate quickly, and then let them sit in the fridge while you get ready for your spooky gathering!
Step-by-Step Instructions:
1. Prepare the Chocolate Pudding:
In a large bowl, whisk together the instant chocolate pudding mixes and cold milk for about 2 minutes until it thickens nicely. Once ready, cover it and place it in the refrigerator to set while you move on to the next step.
2. Make the Cream Cheese Mixture:
In another mixing bowl, beat the softened cream cheese until it’s smooth and creamy. Add the powdered sugar and mix well. Gently fold half of the thawed whipped topping into this mixture until fully combined and fluffy.
3. Prepare the Orange Layer:
Take a portion of the cream cheese mixture and mix in your orange gel food coloring or orange frosting until you get a nice even color. You want it to resemble a bright orange pumpkin color!
4. Build the Dirt Cups:
Grab your clear plastic cups and start layering:
- Begin with a layer of the crushed chocolate cookies to make the “dirt.”
- Add a generous layer of the chocolate pudding.
- Top with a layer of the orange cream cheese mixture.
- Repeat the layers until the cup is about 3/4 full, finishing with another layer of crushed cookie on top.
5. Decorate the Dirt:
Now for the fun part! Press Halloween-themed decorations like chocolate cookies designed as tombstones, gummy worms, candy skulls, and mini marshmallow skulls into the cookie “dirt” on top of your cups. Make them as spooky or fun as you like!
6. Optional Drips:
If you want to add an extra creepy effect, take some black food coloring, mix it with a bit of water or gel, and drizzle it around the inside edges of the cup before layering. This creates a ghostly drip effect that will impress your guests!
7. Chill:
Cover your cups and pop them in the fridge for at least an hour. This helps the flavors blend and will keep the layers nice and firm.
8. Serve:
Once chilled and ready, carefully place the cups on a festive tray and enjoy your spooky Graveyard Dirt Cups with friends and family! They’re sure to be a hit at any Halloween gathering!
Can I Use Different Flavors of Pudding?
Absolutely! While chocolate pudding adds a rich flavor, you can experiment with other options like vanilla or butterscotch pudding. Just keep in mind that the flavor and color of your dirt cups will change accordingly!
Can I Make These Dairy-Free?
Yes! You can substitute the regular cream cheese with a dairy-free cream cheese alternative, use almond or coconut milk for the pudding, and utilize a non-dairy whipped topping. Just check the labels to ensure they fit your dietary needs!
How Long Do Leftovers Last?
Stored in an airtight container in the fridge, your leftover Graveyard Dirt Cups should stay fresh for about 2-3 days. Just be sure to add any decorations right before serving to keep them looking fresh!
Can I Use Fresh Fruit for Decorations?
Definitely! Fresh fruit like raspberries or sliced strawberries can make for a delicious and colorful decoration, giving a fun, spooky, and nutritious twist while also changing the flavor profile. Just ensure the fruits are added right before serving to keep them looking fresh!