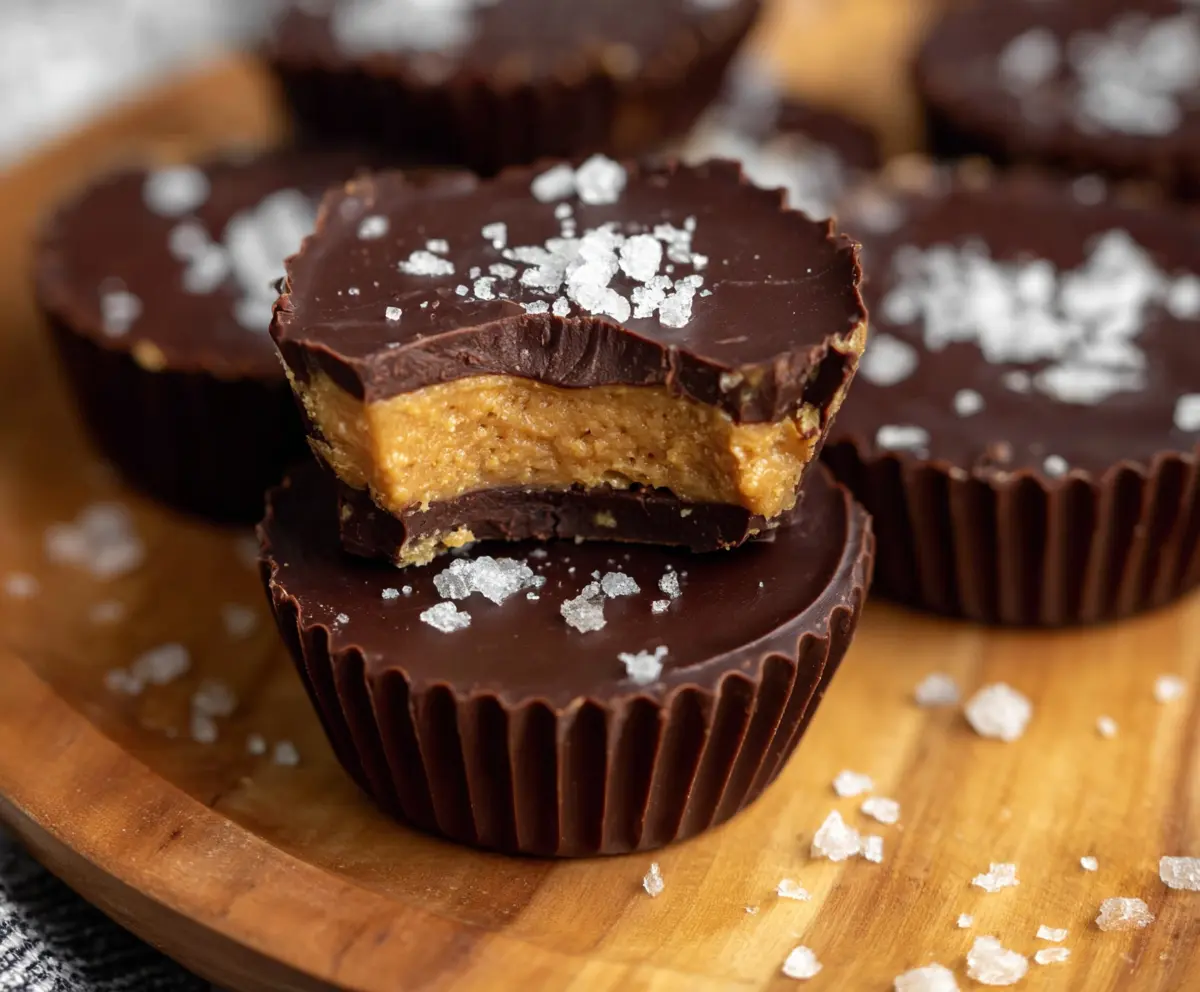
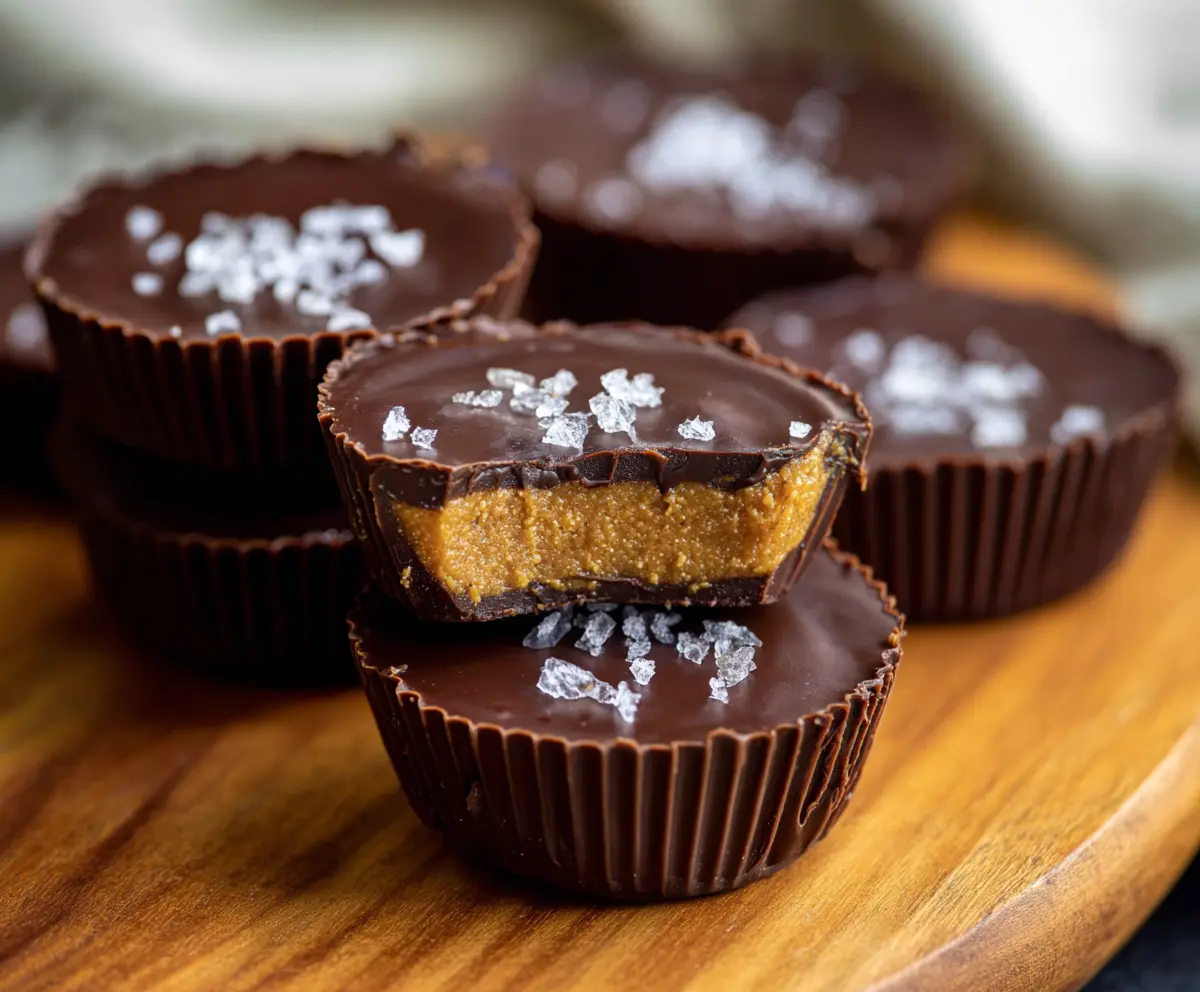
These Protein Peanut Butter Cups are a tasty treat that packs a punch! Made with creamy peanut butter and a rich chocolate coating, they’re perfect for a snack or dessert.
Who can resist a chocolatey delight filled with peanut butter goodness? I often enjoy them after a workout—talk about a sweet reward! Plus, they’re super easy to whip up.
Key Ingredients & Substitutions
Peanut Butter: Natural peanut butter is the star! Choose smooth for a creamy texture or crunchy for some bites. If you’re allergic, sunbutter or almond butter are great alternatives.
Protein Powder: Vanilla protein powder adds a lovely flavor. However, if you prefer a different taste, try chocolate or any plant-based protein powder.
Sweeteners: Honey gives a nice texture and taste, but you can swap it with maple syrup for a vegan option or stevia for lower calories.
Flours: Coconut flour helps bind and firm the filling, while almond flour can add a nuttier flavor. If you’re gluten-free, both work well! For a different texture, consider oat flour.
Chocolate Chips: I recommend dark chocolate for a rich finish. If you like sweeter treats, semi-sweet chips do the job. Look for dairy-free chips if needed!
How Can I Get the Chocolate to Melt Smoothly?
Melting chocolate can be tricky, but here’s how to do it well:
- Use a microwave-safe bowl. Heat the chocolate chips in 20-second intervals to prevent burning.
- Stir after each interval for even melting. If you want extra smooth chocolate, mixing in a teaspoon of coconut oil helps.
- Be patient, don’t overheat! If you see any chunks remain, let it sit for a minute before stirring again.
Taking your time with the melting process will make your Protein Peanut Butter Cups even more delightful!”
How to Make Protein Peanut Butter Cups
Ingredients You’ll Need:
For the Peanut Butter Filling:
- 1 cup natural peanut butter (smooth or crunchy based on preference)
- 1/4 cup vanilla or unflavored protein powder
- 2 tablespoons honey or maple syrup
- 1/4 cup coconut flour or almond flour (to help firm the filling)
- 1/2 teaspoon vanilla extract
- 1 pinch of salt (optional)
For the Chocolate Coating:
- 1 1/2 cups dark or semi-sweet chocolate chips
- 1 teaspoon coconut oil (optional, for smoother melting)
For Topping:
- Flaky sea salt, for topping
Time Estimate:
This delightful recipe takes about 15 minutes to prepare, with an additional 30-40 minutes for chilling. In total, expect around 1 hour to have your tasty treats ready!
Step-by-Step Instructions:
1. Prepare the Peanut Butter Filling:
In a medium bowl, mix the natural peanut butter, protein powder, honey (or maple syrup), coconut flour (or almond flour), vanilla extract, and a pinch of salt. Stir until you have a thick, firm dough. If the mix feels too dry, add a splash of almond milk or water; if too wet, sprinkle in a bit more flour until you get the right texture.
2. Set Up Your Cupcake Liners:
Line a muffin tin with mini cupcake liners. This will help keep your cups intact and make them easy to remove later.
3. Melt the Chocolate:
In a microwave-safe bowl, melt half the chocolate chips and the coconut oil. Heat in 20-second intervals, stirring each time until the chocolate is completely smooth and melted.
4. Create the Chocolate Base:
Spoon about 1 teaspoon of the melted chocolate into the bottom of each cupcake liner. Use the back of a spoon to spread it evenly and cover the bottom completely. Place the tray in the freezer for about 10 minutes to allow the chocolate to firm up.
5. Add the Peanut Butter Filling:
Once the chocolate base is firm, add about 1 tablespoon of the peanut butter filling in the center of each cup. Gently press it down and spread it evenly, but leave enough room for a top layer of chocolate.
6. Melt the Remaining Chocolate:
Repeat the melting process with the remaining chocolate chips and coconut oil until smooth.
7. Cover the Filling:
Spoon or pour the melted chocolate over the peanut butter filling in each cup, ensuring it covers completely.
8. Add the Flaky Sea Salt:
Before the chocolate sets, sprinkle a pinch of flaky sea salt on top of each cup for that added touch of flavor.
9. Freeze the Cups:
Place the muffin tin back in the freezer for at least 30 minutes, or until the cups are fully set and firm.
10. Enjoy Your Treats:
Remove the protein peanut butter cups from the freezer and let them sit for a few minutes at room temperature to soften slightly. Then, enjoy your delicious homemade treats! Any leftovers can be stored in the refrigerator or freezer for later snacking.
These Protein Peanut Butter Cups are not only a tasty indulgence but also pack a healthy punch of protein, making them a perfect energy-boosting snack!
Can I Use Other Nut Butters Instead of Peanut Butter?
Absolutely! You can substitute almond butter, cashew butter, or even sunbutter for a nut-free option. Just keep in mind that the flavor will change slightly depending on the type you choose.
How Do I Store These Protein Peanut Butter Cups?
Store them in an airtight container in the refrigerator for up to a week, or in the freezer for up to three months. They’re great to keep on hand for a quick snack!
Can I Use Protein Powder with Flavors?
Yes! Flavored protein powders like chocolate or cookies and cream can add extra taste to your cups. Just make sure to adjust other sweeteners accordingly to prevent them from becoming too sweet.
What Can I Use Instead of Coconut Flour?
If you don’t have coconut flour, almond flour works well as a substitute. Just remember that coconut flour absorbs more moisture, so you might need to adjust the liquid ingredients slightly if you switch.