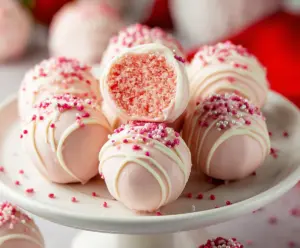
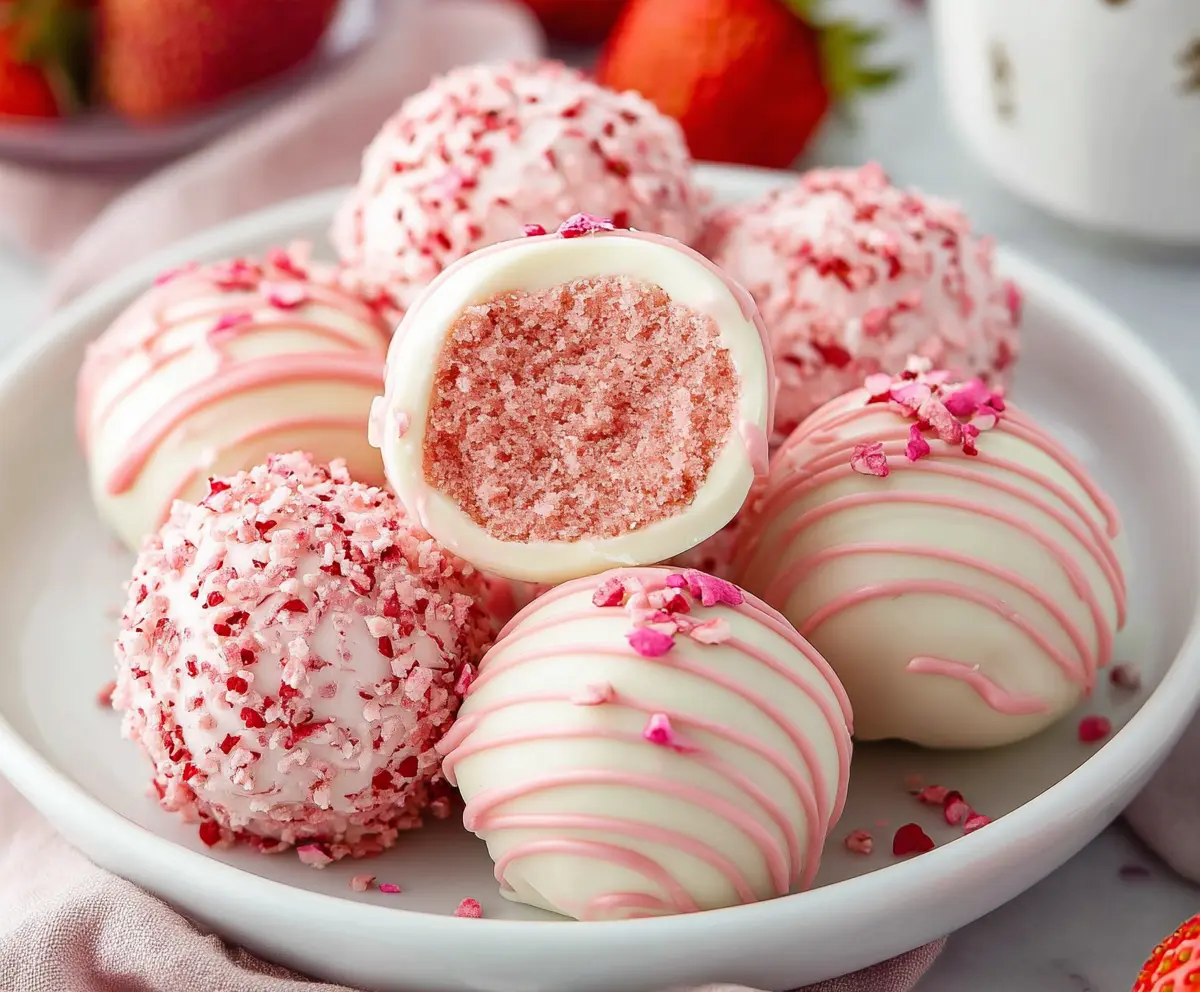
These strawberry cake balls are sweet little treats made from moist strawberry cake and creamy frosting, all coated in chocolate. They are perfect for parties or just a fun snack!
I love how easy they are to make! You just mix, shape, and dip. Plus, they look so cute on a plate that you won’t be able to resist sharing—if you can keep your hands off them! 😋
Key Ingredients & Substitutions
Strawberry Cake Mix: If you’re in a hurry, a box mix saves time. But using a homemade strawberry cake gives a fresh taste. You can also use other flavored cake mixes, like vanilla or chocolate, for a twist.
Frosting: I prefer cream cheese frosting for its tangy flavor, but strawberry frosting keeps it sweet and fruity. You could also make your own frosting to control the sweetness or use a dairy-free option if needed.
White Chocolate: Candy melts are easy and come in fun colors. If you want a lower-calorie option, try using yogurt coating instead. Just ensure it’s suitable for melting!
Food Coloring: This is optional, but a few drops of pink could brighten up the cake balls. If you want to keep it natural, try beet juice for color without artificial additives.
How Can I Make Sure My Cake Balls Hold Their Shape?
The trick to rolling cake balls is in the mixing! After crumbling the cake, gradually add the frosting. You want a consistency that sticks together without being too wet. If the mixture feels too dry, add a bit more frosting, but be careful not to overdo it!
- Make sure the cake is completely cooled before crumbling.
- Use your hands to combine; it helps you gauge the texture better.
- Roll them tightly, about 1-inch in size to ensure they set well.
Finally, refrigerating them before coating is key. It helps them firm up, making dipping in chocolate much easier! Enjoy the process; these cake balls are a hit at parties!
How to Make Strawberry Cake Balls
Ingredients You’ll Need:
For the Cake:
- 1 box strawberry cake mix (or homemade strawberry cake)
- Ingredients listed on the cake mix box (usually eggs, oil, water)
For the Frosting:
- 1 can (16 oz) strawberry or cream cheese frosting
For the Coating:
- 16 oz white chocolate or white candy melts
- Pink food coloring (optional, to enhance coating color)
For Decoration:
- Pink, white, and red sprinkles
How Much Time Will You Need?
This fun recipe will take you about 1 hour to prepare and an additional 1.5 hours for chilling. Here’s how it breaks down: around 20-30 minutes for baking and preparation, plus 60 minutes of chilling for the cake balls and 30 minutes for the final set. So, in total, you’re looking at about 2.5 hours before they’re ready to serve!
Step-by-Step Instructions:
1. Bake the Cake:
Start by preheating your oven according to the instructions on the cake mix box. Prepare the strawberry cake mix as directed, mixing in the required eggs, oil, and water. Once the cake is done baking, let it cool completely on a wire rack.
2. Crumble the Cake:
After the cake has cooled, grab a large mixing bowl and crumble the entire cake into it. You want it finely crumbled, like sand, so it mixes well with the frosting.
3. Mix with Frosting:
Now it’s time to add some sweetness! Mix in about half to two-thirds of the frosting into the cake crumbs. Stir it well until the mixture is moist but not soggy. It should hold together nicely when you roll it into a ball. If it feels too crumbly, add more frosting a little at a time until you reach the right texture.
4. Form the Balls:
Line a baking sheet with parchment or wax paper. Take small portions of the cake mixture and roll them into 1-inch balls. Place them neatly on the prepared baking sheet.
5. Chill the Cake Balls:
Pop the baking sheet into the refrigerator and let the cake balls chill for at least 1 hour. This helps them firm up so they won’t fall apart while coating.
6. Melt the Coating:
While the cake balls are chilling, prepare your coating! In a microwave-safe bowl, melt the white chocolate or candy melts. Heat in 30-second intervals, stirring after each, until completely smooth. If you’d like a pretty pink tint, now’s the time to add a few drops of pink food coloring.
7. Coat the Cake Balls:
Using a fork or a dipping tool, carefully dip each chilled cake ball into the melted coating. Make sure to cover it entirely, then let any excess drip off back into the bowl.
8. Decorate:
Return the coated cake balls to the parchment-lined baking sheet. Before the coating sets, drizzle some extra melted white chocolate over the top and sprinkle with your choice of pink, white, and red sprinkles for decoration.
9. Final Chill:
Once decorated, pop the cake balls back into the fridge for another 30 minutes to allow the coating to set completely.
10. Serve and Enjoy:
These delightful strawberry cake balls can be enjoyed chilled or at room temperature. If you have leftovers, store them in an airtight container in the refrigerator. Enjoy your delicious treats!
Can I Use a Different Cake Flavor?
Absolutely! While strawberry cake adds a lovely flavor, you can use any cake mix you like, such as vanilla, chocolate, or even red velvet. Just adjust the frosting and coatings to match your chosen flavor for the best results.
How Should I Store Leftover Cake Balls?
Store any leftover cake balls in an airtight container in the refrigerator. They’ll stay fresh for about 3-5 days. For longer storage, you can freeze them! Just make sure they’re fully set before placing them in a freezer-safe container. Thaw in the fridge before serving.
What if My Cake Balls Are Too Crumbly?
If your mixture is crumbling and not holding together, try adding more frosting gradually until it reaches the right consistency. You want it damp enough to hold shape without being overly wet. Don’t hesitate to knead the mixture with your hands to help it combine better!
Can I Make These Cake Balls Ahead of Time?
Definitely! You can prepare them up to a few days in advance. Just make sure to store them properly in the fridge after they’ve been coated and set. They’re perfect for parties or events when made ahead!