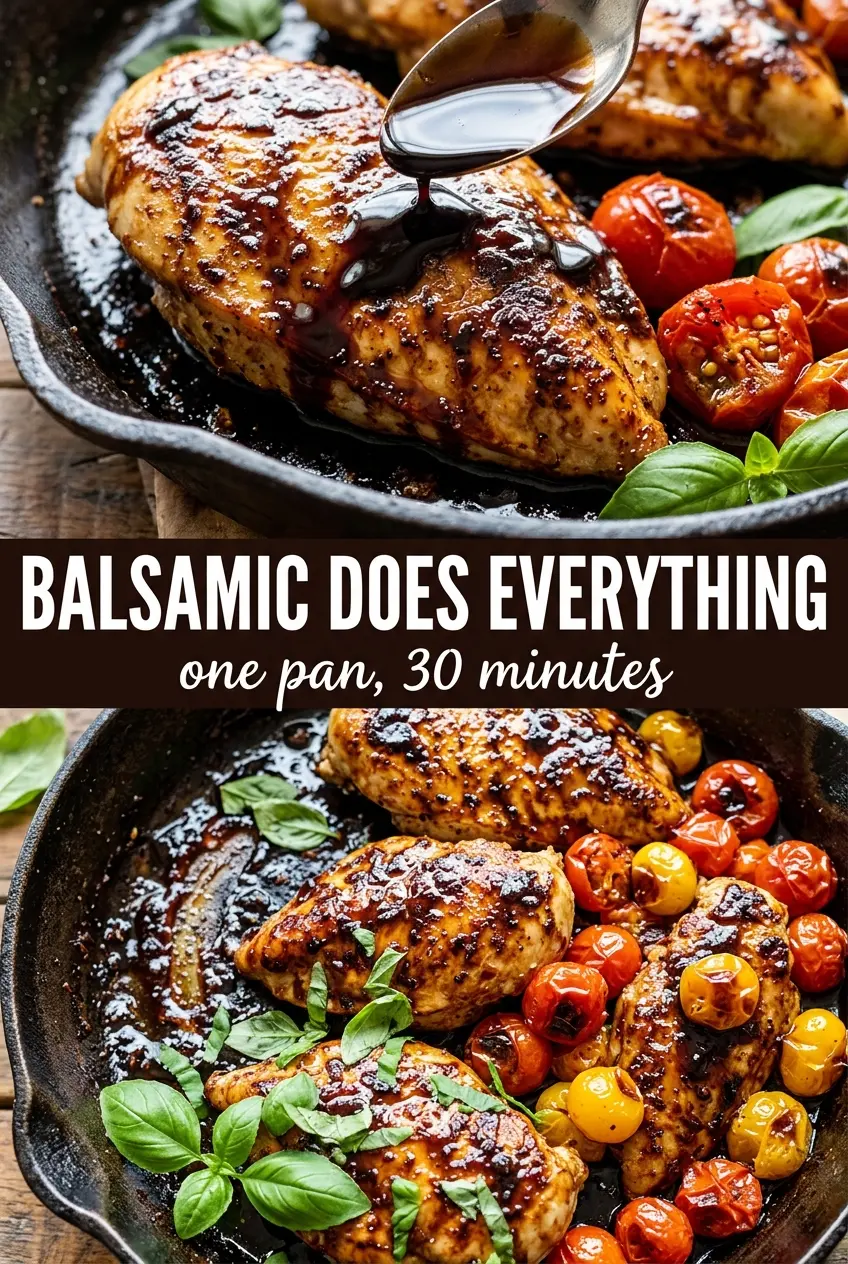
One pan balsamic chicken earns its place in the rotation because the sauce turns glossy and dark, the chicken skin stays crisp enough to crack with a fork, and the tomatoes collapse just enough to sweeten the whole skillet. It tastes like you spent a lot longer on it than you did, which is exactly the kind of dinner worth keeping around.
The trick here is treating the balsamic like a glaze in progress, not a sauce you pour on at the end. It starts with a hard sear on skin-on thighs, then the browned bits in the pan dissolve into the vinegar, broth, and honey. That’s where the depth comes from. Bone-in thighs hold up better than breasts in this kind of one-pan simmer, and the skin has time to stay intact while the sauce reduces around it instead of soaking through it.
Below, I’ll walk you through the sear that gives the chicken its texture, the small details that keep the glaze from tasting sharp, and a few smart variations if you need to work with what you’ve got.
The sauce reduced into that sticky balsamic glaze I was hoping for, and the chicken skin stayed crisp even after simmering. My husband asked if I could put this in the regular dinner rotation.
Love the sticky balsamic glaze and crisp chicken skin? Save this one pan balsamic chicken for your next skillet dinner.
The Sear Is What Gives the Glaze Something to Hold Onto
The biggest mistake in skillet balsamic chicken is rushing past the sear and hoping the sauce will carry the dish. It won’t. You need those deeply browned bits from the chicken skin and the skillet bottom because the balsamic, broth, and honey turn them into the base of the glaze. Without that first hard sear, the sauce tastes flatter and the chicken skin goes soft faster.
Cast iron helps here because it holds heat steadily enough to crisp the skin before the chicken starts steaming. Keep the heat at medium-high for the initial sear, then lower it once the sauce goes in. If the pan is too hot when the balsamic hits, the honey can scorch and the sauce turns bitter before it thickens.
- Bone-in, skin-on chicken thighs — These stay juicy through the final simmer and the skin gives you a proper crisp edge. Boneless thighs work in a pinch, but they cook faster and won’t build the same pan flavor.
- Balsamic vinegar — Use a balsamic you’d actually taste on a salad. It doesn’t need to be expensive, but very sharp vinegar will need the honey and broth to round it out.
- Cherry tomatoes — They burst into the sauce and add sweetness that balances the vinegar. Grape tomatoes work the same way if that’s what you have.
- Chicken broth — This keeps the glaze from turning too thick too fast and gives you enough liquid to finish cooking the chicken without burning the sugars.
- Butter — Stirred in at the end, it softens the glaze and gives it that lacquered finish. Don’t add it early or it can separate while the sauce reduces.
What Each Ingredient Is Actually Doing in This Chicken Dish

- Chicken (pat dry for browning) — Room temperature cooks more evenly. Even pieces ensure uniform doneness.
- Oil or butter (the browning medium) — High-heat oil essential for proper searing. Creates pan flavor.
- Seasonings (salt, pepper, spices) — Apply generously. Chicken carries the entire flavor profile.
- Aromatics (garlic, ginger, herbs) — Cook with fat to bloom flavors. Become the foundation.
- Sauce or braising liquid (if using) — This keeps chicken moist. Balance richness with acid.
- Vegetables (if using) — Layer by cooking time so everything finishes together.
- Acid (vinegar, wine, lime, or pineapple) — This brightens and prevents one-dimensional flavor.
- Proper doneness (165°F internal temperature) — Use thermometer for accuracy. Overcooked is dry.
Building the Skillet from Crisp Skin to Glossy Sauce
Season and Sear the Chicken First
Season the thighs generously on both sides with salt, pepper, garlic powder, and Italian seasoning, then lay them skin-side down in hot olive oil. You want a steady sizzle the moment they hit the pan. Leave them alone for 7 to 8 minutes so the skin turns deep golden and releases cleanly; if it sticks, it needs another minute. Flip and sear the second side for about 3 minutes, then pull them out while the skin is still intact and crisp.
Wake Up the Garlic and Tomatoes
Add the whole garlic cloves and cherry tomatoes to the skillet and cook just until the tomatoes start to blister and the garlic takes on color at the edges. This short stage pulls flavor out of the pan without burning the garlic, which turns harsh fast in cast iron. If the pan looks dry, the tomatoes will give off juice as they warm and help loosen the fond. Keep the heat moving but not aggressive.
Reduce the Balsamic Into a Glaze
Pour in the balsamic vinegar, honey, and chicken broth, then stir while scraping up every browned bit from the bottom. Bring it to a boil for a moment, then settle into medium heat so the liquid reduces instead of wildly evaporating. The sauce should look thin at first, then start to coat the back of a spoon and darken into a glossy glaze. If it tastes sharp before it thickens, give it another minute or two; reduction softens the vinegar more than extra honey does.
Finish the Chicken in the Sauce
Return the chicken skin-side up and let it cook in the simmering sauce until the thickest part reaches 165°F. The skin should stay above the liquid as much as possible so it doesn’t lose all its crispness. Stir in the butter at the end, once the heat is lower, so the glaze turns smooth and shiny instead of oily. Scatter basil over the skillet right before serving so it stays bright and fresh.
How to Adapt the Skillet Without Losing the Point of the Dish
Boneless Chicken Thighs for Faster Cooking
Boneless thighs work well if you want a shorter cook time, but they won’t protect the sauce the same way bone-in thighs do. Sear them for less time on the first side and check early so they don’t overcook while the glaze reduces. You’ll still get rich flavor, just with a softer final texture.
Dairy-Free Version
Skip the butter and finish with a spoonful of olive oil instead. The glaze won’t have quite the same silky finish, but it will still reduce into a glossy coating. This is the easiest swap in the recipe and it keeps the whole skillet dairy-free without changing the method.
Lower-Sugar Balance
If you want the balsamic to lead more and the glaze to feel less sweet, cut the honey back slightly. The sauce will take a little longer to round out, so let it reduce until it tastes balanced instead of chasing sweetness with more honey. You’ll get a sharper, more savory finish.
What to Serve With It
This skillet is strongest with something that can catch the sauce, like mashed potatoes, polenta, rice, or crusty bread. The glaze is the payoff, so don’t hide it under a pile of side dishes. Keep the sides simple and let the skillet do the talking.
Storage and Reheating
- Refrigerator: Store leftovers in an airtight container for up to 4 days. The skin softens as it sits, but the flavor gets deeper.
- Freezer: It freezes fairly well for up to 2 months, though the tomato texture will soften after thawing. Freeze the chicken and sauce together, then thaw in the fridge overnight.
- Reheating: Warm gently in a covered skillet over low heat with a splash of broth. High heat will tighten the chicken and can make the glaze taste overly reduced.
Answers to the Questions Worth Asking
One Pan Balsamic Chicken
Ingredients
Equipment
Method
- Season the chicken thighs generously on both sides with salt, pepper, garlic powder, and Italian seasoning, keeping the surface evenly coated.
- Heat olive oil in a large cast iron skillet over medium-high heat, then sear chicken skin-side down for 7-8 minutes until skin is deeply golden and crispy.
- Flip the chicken and sear for 3 more minutes, then remove the chicken to a plate.
- Add whole garlic cloves and cherry tomatoes to the skillet and cook for 2 minutes until the tomatoes begin to blister.
- Pour in balsamic vinegar, honey, and chicken broth, then stir and bring to a boil while scraping up any browned bits from the bottom of the skillet.
- Return the chicken skin-side up to the skillet and cook over medium heat for 12-15 minutes until the chicken reaches 165°F and the balsamic sauce reduces to a thick glaze.
- Stir in butter until melted, scatter fresh basil over the top, and serve straight from the skillet.